Showing posts with label Party Food. Show all posts

Wednesday, May 21, 2014

Asparagus, Goat Cheese, and Bacon Pizza

Yes you did just die and go to pizza heaven.  
Right out of the oven


I found this idea on allrecipes as I was searching for asparagus recipes.  I hadn't made pizza in awhile and this sounded AMAZING so I went for it. You will need:

1 pizza crust. I used Pamela's bread mix and the pizza crust recipe on the bag. 
1 pound bacon, cooked to be slightly chewy-almost crunchy
1 bunch asparagus spears, cut in half
1 tablespoon butter
3 cloves garlic, minced
4 oz goat cheese
mozzarella cheese or any type of pizza cheese or italian cheese blend

This pizza crust had to bake for 25 minutes before it got topped so while it was in the oven I cooked the bacon and then sauteed the asparagus with the butter and some of the bacon grease until it was tender. I tossed the garlic in with the asparagus for its last 3-4 minutes of cooking.  When the crust came out, I drizzled it with olive oil and put lots of italian cheese blend all over it and then sprinkled on the bacon, placed the asparagus, and crumbled the goat cheese on top.  I should have sealed the toppings in with another layer of cheese blend.  Then back in the oven for 10 more minutes.  

This pizza was so delicious I wanted to just crawl inside the crust and die. I had probably 2 pieces too many and while I was putting it away I took a bit of each piece because I couldnt. stop. eating. it. 


Monday, December 9, 2013

Pumpkin Dip


I've been steadily plowing my way through pumpkin recipes; it seems my pumkin craving is even more pronounced this year.  Luckily, Pinterest has kept me well supplied with yummy things to try.  Original post of this recipe is here.  I've taken this dip to a couple different events and it's been a huge hit.  Start thinking Christmas parties now that Thanksgiving is over...

Dip:
8 oz package of cream cheese, softened
1 cup powedered sugar
15 oz can of pumpkin
1 teaspoon vanilla
1/2 teaspoon cinnamon

Apple slices for dipping

Mix everything together in a bowl using a hand mixer/beaters.  Store in the fridge until ready to serve.  Top with candied pecans to make it extra yummy and serve with apple slices!

Candied Pecans:
1 cup pecan halves
1 tablespoon butter
1 tablespoon maple syrup
1 tablespoon brown sugar, packed

Preheat oven to 350 degrees.
Melt butter in a sauce pan over medium heat.
Add maple syrup and brown sugar and stir to combine.
Add pecans and stir to coat.
Spread pecans on a baking sheet lined with parchment paper.
Bake pecans for 5-6 minutes or until golden brown and fragrant.
Cool completely and then coarsely chop.

Monday, November 25, 2013

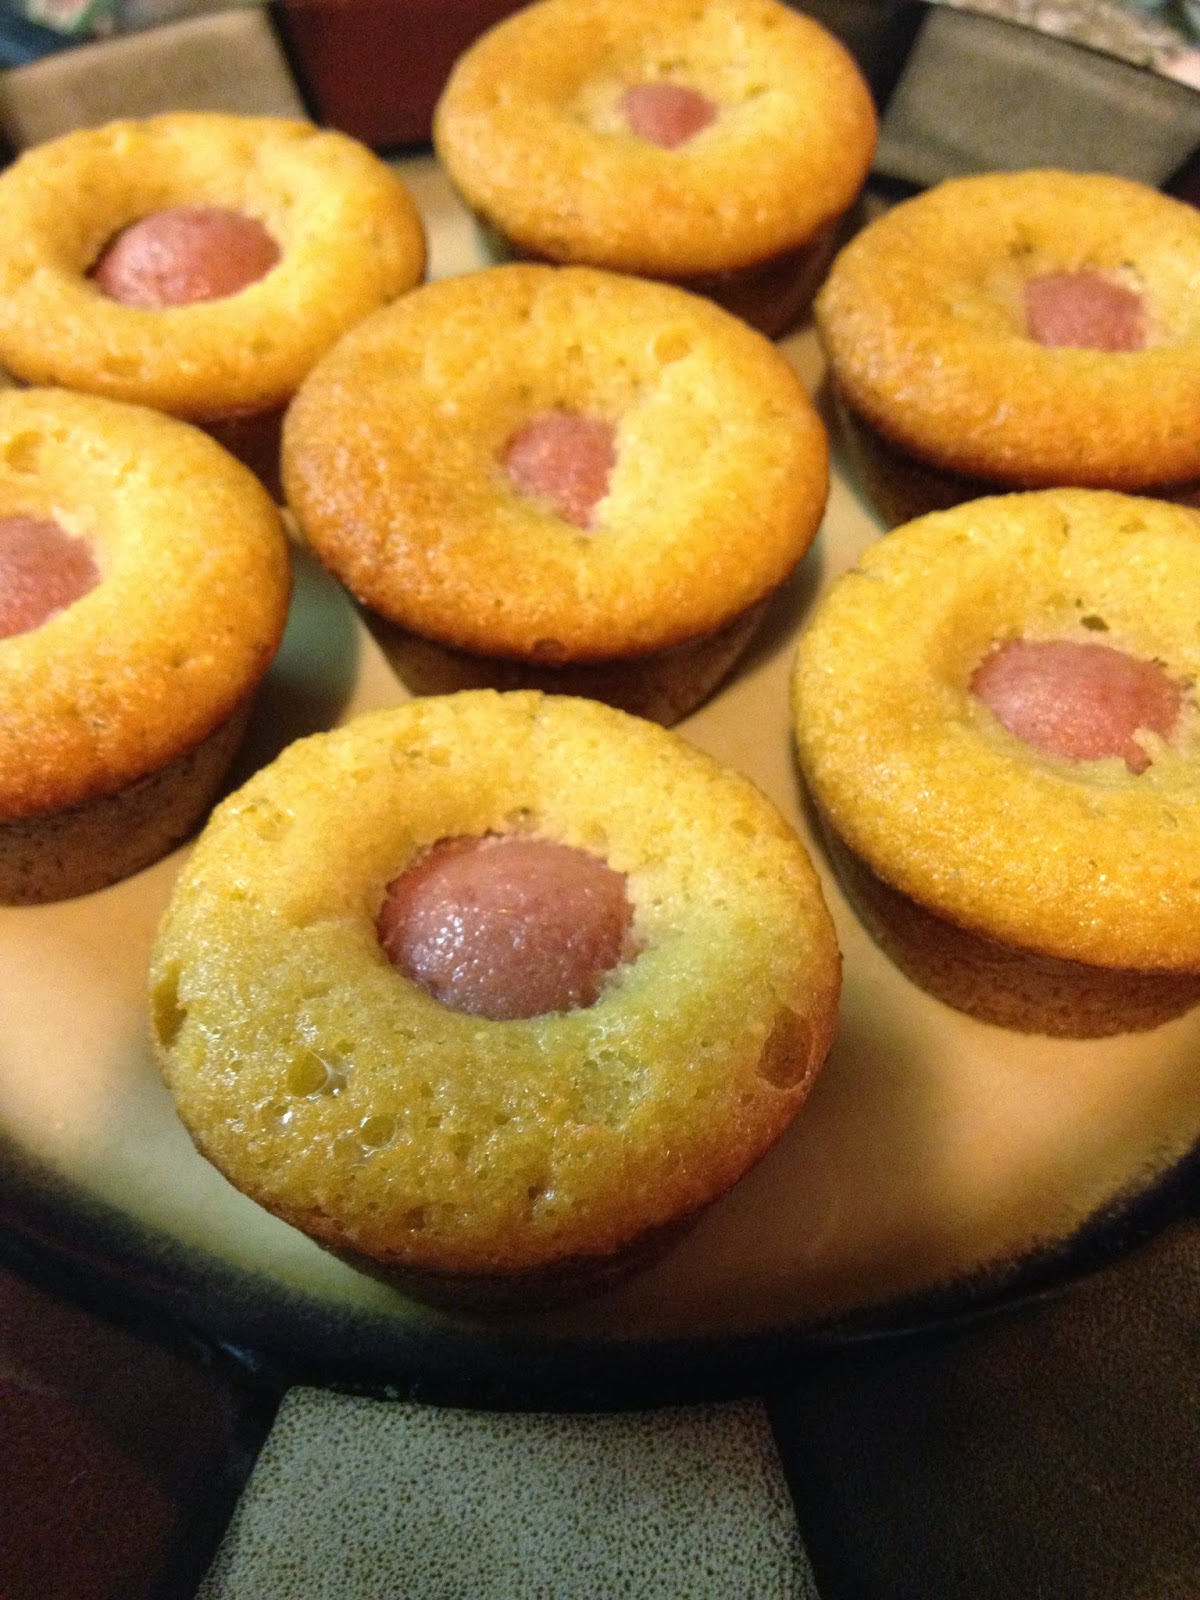
"Corn" dog bites


Who doesn't enjoy a good corn dog?  Jenna sure does - that's her little hand trying to reach the plate as I snapped the picture!  A corn dog is probably the one thing I missed having at the state fair this year.  Lucky pinterest had me covered!  Check out the original post here.  These were so quick to whip up and tasted super amazing!  Grab some ketchup or mustard and go to town!

1/4 cup melted butter
3 eggs
2 tablespoons honey
1/4 cup almond flour, firmly packed
2 tablespoons coconut flour, firmly packed
1/4 teaspoon baking soda
1/4 teaspoon salt
3-4 hot dogs, cut into 1/2 inch pieces

Preheat oven to 325 degrees.
Whisk together melted butter, eggs, and honey.
Stir in the flours, baking soda, and salt.
Scoop into a greased mini muffin pan, about 1 tablespoon of batter in each cup.
Place 1 hot dog piece in each muffin.
Bake for 14-17 minutes, until golden brown.

Tuesday, November 12, 2013

Spiced Pear and Pomegranate Salad


If you're looking for a fun new recipe to spice up your holiday meals, then this is the one for you!  Pomegranates, in addition to being delicious, always seem so festive, and are one of my favorite winter fruits.  This salad is super quick to throw together and always gets rave reviews.  The recipe is just a jump off point, as I always use more fruit than it calls for.  Also, if you want to save time and don't care as much for presentation, you can skip peeling the pears; it will still taste delicious.

3 pears, peeled and cut into slices
1 pomegranate, (skin and membrane removed)
1 tablespoon fresh lemon juice
2 tablespoons brown sugar
1/4 teaspoon nutmeg
1/2 teaspoon cinnamon

Place the pears and pomegranate seeds (arils) in a bowl and toss with the lemon juice.  In a separate bowl combine the brown sugar, nutmeg, and cinnamon, then stir into the fruit.  Cover and chill until ready to serve.


Saturday, June 15, 2013

Yummiest Fruit Dip EVER


This recipe is a surefire crowd-pleaser!  I go through phases where I'll make it several times over a few weeks because I just can't get enough of it.  Be careful if you have small children....they tend to double (and triple) dip just to get more of the creamy goodness.

1 (8 oz.) package of cream cheese - at room temp'
2 teaspoons orange zest (however much you get off one orange)
3 tablespoons orange juice concentrate (not an exact science, just put in a few spoonfuls)
1/4 teaspoon vanilla
pinch of salt
1 (7 oz.) jar marshmallow cream

Beat cream cheese in a bowl with a hand mixer.  Add orange zest, orange juice, vanilla, and salt and beat until smooth and creamy.  Add marshmallow cream and beat until smooth.

This works well to make the night before you need it and just stick it in the fridge.  I like it best with strawberries.

Tuesday, June 4, 2013

Kale Chips


It seems like kale chips are all the rage right now.  I know Jessica tried to make a batch once that ended up a disaster, so I was intrigued to try them myself.  I had a beautiful bunch of kale just sitting in the fridge so I decided to see what all the fuss was about.  After reading through countless recipes online (all of which are basically the same), here is what I came up with:

Preheat oven to 350 degrees.
Wash and dry the kale.
Tear it into bite size pieces.
Coat the pieces with extra virgin olive oil.  I wish I had a misto sprayer to assist with this step, but alas, I don't.  I drizzled some on the kale and tossed/coated them all by hand.
Set the pieces on a foil covered (b/c I enjoy easy clean up) baking sheet.  It works well to set them curly side down so they form little tents.
Sprinkle with salt/pepper/seasoning of your choice.  We went with Salt'n Spice - it sounded fun for the maiden voyage.
Bake for 10-15 minutes
WATCH THEM CLOSELY!  Smaller pieces might be done faster so you'll want to pull them out.  You DO NOT want them to get brown at all - it will make them taste yucky instead of delicious.

Fresh out of the oven!
They turned out AMAZING!!  All crispy and yummy.  Even 3 year old Jenna loved them.  In fact she and I sat there and ate the entire first batch in no time flat.  Good thing we had enough for a second batch so we could take some pictures and share with Joey!  Just writing about them makes me want more...better run to the store...


Wednesday, April 17, 2013

Coconut Shrimp

I love coconut shrimp. End of story. Well, almost.

Now for a picture walk, followed with the recipe!


Easy Baked Coconut Shrimp (original recipe here)


18-24 medium to large raw shrimp (original recipe said to butterfly them, but I didn't)
1 cup dry shredded/flaked coconut (baking type)
2-3 eggs

Breading (flouring?)
1/2 cup coconut flour
2 T ground flax seed1/2 tsp. salt
1 tsp. onion powder
1 tsp. garlic salt
1/2 tsp. dried crushed chili
1 tsp. white sugar

1. Preheat oven to 425 degrees. Line a cookie sheet with parchment paper.
2. Mix breading ingredients together in one bowl. Place coconut in a second bowl, and beat the eggs in a third bowl.
3. Dip shrimp in this order: egg, breading, egg, coconut. Lay shrimp onto parchment paper. Repeat. 
4. Bake shrimp for 15 minutes, turning halfway through. 
5. Let them cool slightly, smother in sweet chili sauce, and eat all of them.

*Note* I used Panda Express's Sweet Chili Sauce. I read the ingredients and while nothing seemed gluteny, it did not say gluten-free...so I don't really know. I do know that I had planned to make my own sauce, but it contains fish sauce, which was about $5 at my Kroger. The sauce I got was only $4.30. So that and the convenience made the decision pretty easy. However, these little guys would be delicious dipped in just about anything, or on their own!

Wednesday, March 27, 2013

Cucumber Salsa

In my weekly farmer's market produce basket I got a lot of cucumbers and tomatoes so I decided to find a salsa recipe for my salsa loving hubby.  I found this and have made it twice. It is super fresh and delicious!


Cool Cucumber Salsa

2 medium cucumbers - peeled, seeded, and chopped
2 medium tomatoes, chopped
1/2 cup chopped green bell pepper
1 jalapeno pepper, seeded and minced
1 small onion, chopped
1 clove garlic, minced
2 tablespoons lime juice
1 teaspoon minced fresh parsley
2 teaspoons minced fresh cilantro
1/2 teaspoon dried dill weed
1/2 teaspoon salt

In a medium bowl, stir together the cucumbers, tomatoes, green pepper, jalapeno pepper, onion, garlic, lime juice, parsley, cilantro, dill, and salt. Cover and refrigerate for 1 hour. Serve with tortilla chips.

The best way to get the seeds out of the cucumber is to get a teaspoon and use it to scrape out the seeds.    They come out super easy that way.  

I didn't add the fresh parsley because I didn't have any.  I also didn't feel like adding any dill weed.  One time I added too much of it to a recipe one time and now I have been turned off by it.  Enjoy!

Wednesday, March 20, 2013

Chicken Nuggets

I hate days like this:  It was 5:30 pm and I still had no idea what we were going to have for dinner.  The flank steak was in the fridge thawing for tomorrow's dinner (useless!), we were low on fresh veggies, so no inspiration there.  Everything I could think of required a trip to the store, which was so not going to happen.  I talked to Nicole and she was no help - they picked up BBQ for dinner.  Actually, she might have helped.  Got me thinking about eating out and quick and easy meals...I turned to the Wheat Belly Cookbook and BAM!  There was my answer:  homemade chicken nuggets!

1 pound boneless, skinless chicken breasts (or tenderloins!)
2 eggs
2 tablespoons butter, melted
1/2 cup ground golden flaxseeds
1/2 cup grated Parmesan cheese
1/2 teaspoon onion powder
1/4 teaspoon garlic powder
1/4 teaspoon salt
1/4 teaspoon ground black pepper

Preheat the oven to 375.  Line a rimmed baking sheet with parchment paper.  Slice the chicken into 1 1/2 - 2 inch pieces.

In a small bowl, whisk the eggs and butter.  In a shallow bowl, combine the flaxseeds, cheese, onion powder, garlic powder, salt, and pepper.

Coat each piece of chicken in the egg mixture and then roll in the flaxseed mixture.  Place on the baking pan.

Bake for 20 minutes, turning once, or until no longer pink and the juices run clear.

My Take:  YUM!  These really were quick and easy to whip up.  While the chicken thawed in the microwave, (yes, I cheat) and the oven preheated, I threw the rest together.  Dredging each piece took a little time, and I used every last drop of the flaxseed mixture.  The cooking time was perfect and they came out a little golden and smelled delicious.  Threw some green beans and corn on the side and we had a meal!  They were an instant hit with all three of us, and went well with our dipping sauces of choice (guess which belongs to each of us!).  The only problem: not a single leftover.

Tuesday, February 12, 2013

Coconut Funyuns

Once again I needed to find a recipe for something that I had a lot of... and yesterday I felt the need to make something with a lot of onions (or at least 1).  So I opened up the Wheat Belly cookbook to see what recipes could be made and lo and behold I reached Onion Rings.  Perfect! Sounded sooo delish and I knew Taylor loved onion rings so I hoped for the best.  It says to first dredge the sliced and separated rings in a mixture of coconut flour and paprika.  Then dunk them in melted coconut oil mixed with egg and then dredge in a mixture of coconut flour, ground flax seed, and almond meal (which I excluded because I no have it).  Then they are to baked at 450 for like 12 minutes.  So everything is going great and I'm dunking those rings and they look so cute and onion ring-y. (You've got to watch out for that coconut flour though, little by little, some was tracked into the egg mixture and pretty soon it turned into a thick paste and then I add to remake it and keep one hand for the wet and one for the dry dredging. Can you say hassle?!) I put the first cookie sheet of rings in and forgot to lightly spray them with cooking oil like the recipe says.  Oh well.  They should be just fine right? Umm... kinda right.  I pull the rings out of the oven and they don't look bad.  See:


But I bite into one and it is just like "pwaaahhhhhhhh" with powder.  Like talking once you bite into a graham cracker.  NOT crispy like a good onion ring should be. They don't taste bad though.  Taylor comes over, who is already super skeptical of coconut flour and thinks it turns everything it touches into a "macaroon flavored sponge," takes a bite of one and then immediately spits it all out and berates the poor powdery onion ring and its coconuty coating.  "They are horrible, they are ruined, and they are a disgrace to onion rings everywhere!!! I miss when you used to make food that was edible.  I have been so spoiled by your good cooking before this whole gluten-free thing, I should just go to Bojangles (super greasy southern fast food place) and get some REAL onion rings. etc, etc." is practically what he said.  So, feeling a chip on my shoulder to make them palatable to Mr. I hate everything, I heated up some coconut oil and "fried" that first batch.  This is then how they looked:

They got a little more color on them, were a little crunchier, and had no powdery texture in your mouth. Dunk them in ketchup and they are pretty good (according to me. Taylor was not satisfied.)  I enjoyed them and Taylor ate them begrudgingly because I made sad faces throughout the whole meal because he made me feel bad for my cooking. ("It isn't you that is the problem, it's just the ingredient... and the recipe")

So we eat that first batch and then there is a whole other tray of sad onion rings to do something with.  I didn't want to use more coconut oil because dang that stuff is expensive and I just  bought a jar of it and felt like I had already used soo much so I asked Taylor what he thought if I tried to fry them in vegetable oil.  He gave me the go ahead and so I fried them in it.  BLECKKKKK.  Soooooo NASTY! They had such a greasy feeling and tasted fishy to me.  I spit it out in the sink.  Taylor ate the whole pan, bless his heart, because he knew I tried so dern hard to fix those nasty onion rings after he gave me such a hard time.

Moral of the story: Get your rings glutenous or don't get them at all.

P.S. I did enjoy lathering my legs with coconut oil every time I had to get it out of the tablespoon.  It would be all over my fingers, so I would just use it to moisturize as I went.  SO versatile!


Sunday, February 10, 2013

Hors D'oeuvres!

 
For the Super Bowl I wanted to try out some yummy new recipes, perhaps not the healthiest, but definitely delicious, and naturally gluten-free, hooray!

The first is a sesame cream cheese spread, patterned after the appetizer served at The Dodo restuarant in Salt Lake City.  Many thanks to my friend Ashley for figuring this one out!

Sesame Cream Cheese

Cream Cheese
Soy Sauce - make sure you choose a gluten-free one, I use La Choy.
Seasame seeds

Marinate cream cheese in soy sauce for at least an hour.  It's helpful to put it in a little container or bag and rotate it every so often so all the cream cheese gets covered.  Meanwhile, toast some seasame seeds in a pan on the stove (medium heat, stirring frequently, it only takes a few minutes).  Roll the marinated cream cheese in the toasted seasame seed.  Bake in the oven until warm: 350 degrees for 15-20 minutes.  Serve with an assortment of gluten free crackers, apple slices, and pear slices.

This turned out amazing, so close to what I remember at The Dodo.  You can also cut your cream cheese block any size depending on your need.  I did a small test section the day before and then made an entire cream cheese package for game day.  There were no leftovers either time!  My favorite vehicle for this tasty treat is pear slices, but I've found some gluten-free crackers I really like.  The Mary's Gone Crackers brand tastes healthier and more whole grain to me, but I've learned 3 year olds prefer the almond Nut-Thins.


The second treat is something I first tried at my aunt Jenette's (the one who first got us all thinking about gluten-free!) house over the holidays and I've been thinking about it ever since.  Super simple, and a nice change from the bacon-wrapped lil'smokies that are usually a Super Bowl staple for us.

Bacon Wrapped Dates

Dates
Whole almonds (plain)
Bacon
toothpicks

Take a paring knife and cut open the dates to remove the pits.  Insert an almond in its place and close the date back up.  Cut the bacon strips in half so they are not quite so long.  Wrap one cut strip around each date and secure with a toothpick.  Bake until the bacon is cooked to your liking.  I baked at 350 degrees until the bacon looked cooked but not yet crispy, totally a preference thing!

These turned out amazing and were a huge hit.  Even the kids liked them.  I ate myself sick of course, but that's what the Super Bowl is for.